【中】Nacos配置文件如何初始化的
https://www.bilibili.com/video/BV1Zd4UzpE1X
一、如何加载Nacos配置到容器里
1、初始化加载
Nacos 自定义了一个初始化的类 NacosConfigApplicationContextInitializer,继承关系如下
public class NacosConfigApplicationContextInitializer implements ApplicationContextInitializer<ConfigurableApplicationContext> {}SpringBoot在初始化的时候就会循环调用 ApplicationContextInitializer 的 initialize 方法
protected void applyInitializers(ConfigurableApplicationContext context) {
    for (ApplicationContextInitializer initializer : getInitializers()) {
        Class<?> requiredType = GenericTypeResolver.resolveTypeArgument(initializer.getClass(),
                ApplicationContextInitializer.class);
        Assert.isInstanceOf(requiredType, context, "Unable to call initializer.");
        initializer.initialize(context);
    }
}
2、解析data-id数据
在 initialize 方法里会通过配置的 data-id 去请求Nacos获取所有的配置,并加载到容器中去
public void initialize(ConfigurableApplicationContext context) {
    singleton.setApplicationContext(context);
    environment = context.getEnvironment();
    nacosConfigProperties = NacosConfigPropertiesUtils
            .buildNacosConfigProperties(environment);
    final NacosConfigLoader configLoader = NacosConfigLoaderFactory.getSingleton(
            nacosConfigProperties, environment, builder);
    if (!enable()) {
        logger.info("[Nacos Config Boot] : The preload configuration is not enabled");
    }
    else {
        if (processor.enable()) {
            processor.publishDeferService(context);
            configLoader.addListenerIfAutoRefreshed(processor.getDeferPropertySources());
        }
        else {
            // 加载配置
            configLoader.loadConfig();
            configLoader.addListenerIfAutoRefreshed();
        }
    }

    // ....
}
加载的过程就是通过data-id,去请求服务端获取数据,生成NacosPropertySource,然后存入 mutablePropertySources。后面解析数据的时候就会从 NacosPropertySource里面去进行匹配
public void loadConfig() {
// 获取全局的配置文件
MutablePropertySources mutablePropertySources = environment.getPropertySources();
// 去请求Nacos服务端获取数据
List<NacosPropertySource> sources = reqGlobalNacosConfig(globalProperties, nacosConfigProperties.getType());
for (NacosConfigProperties.Config config : nacosConfigProperties.getExtConfig()) {
List<NacosPropertySource> elements = reqSubNacosConfig(config, globalProperties, config.getType());
sources.addAll(elements);
}
if (nacosConfigProperties.isRemoteFirst()) {
for (ListIterator<NacosPropertySource> itr = sources.listIterator(sources.size()); itr.hasPrevious();) {
mutablePropertySources.addAfter( StandardEnvironment.SYSTEM_ENVIRONMENT_PROPERTY_SOURCE_NAME, itr.previous());
}
} else {
// 走这里...,把数据存入到 mutablePropertySources
for (NacosPropertySource propertySource : sources) {
mutablePropertySources.addLast(propertySource);
}
}
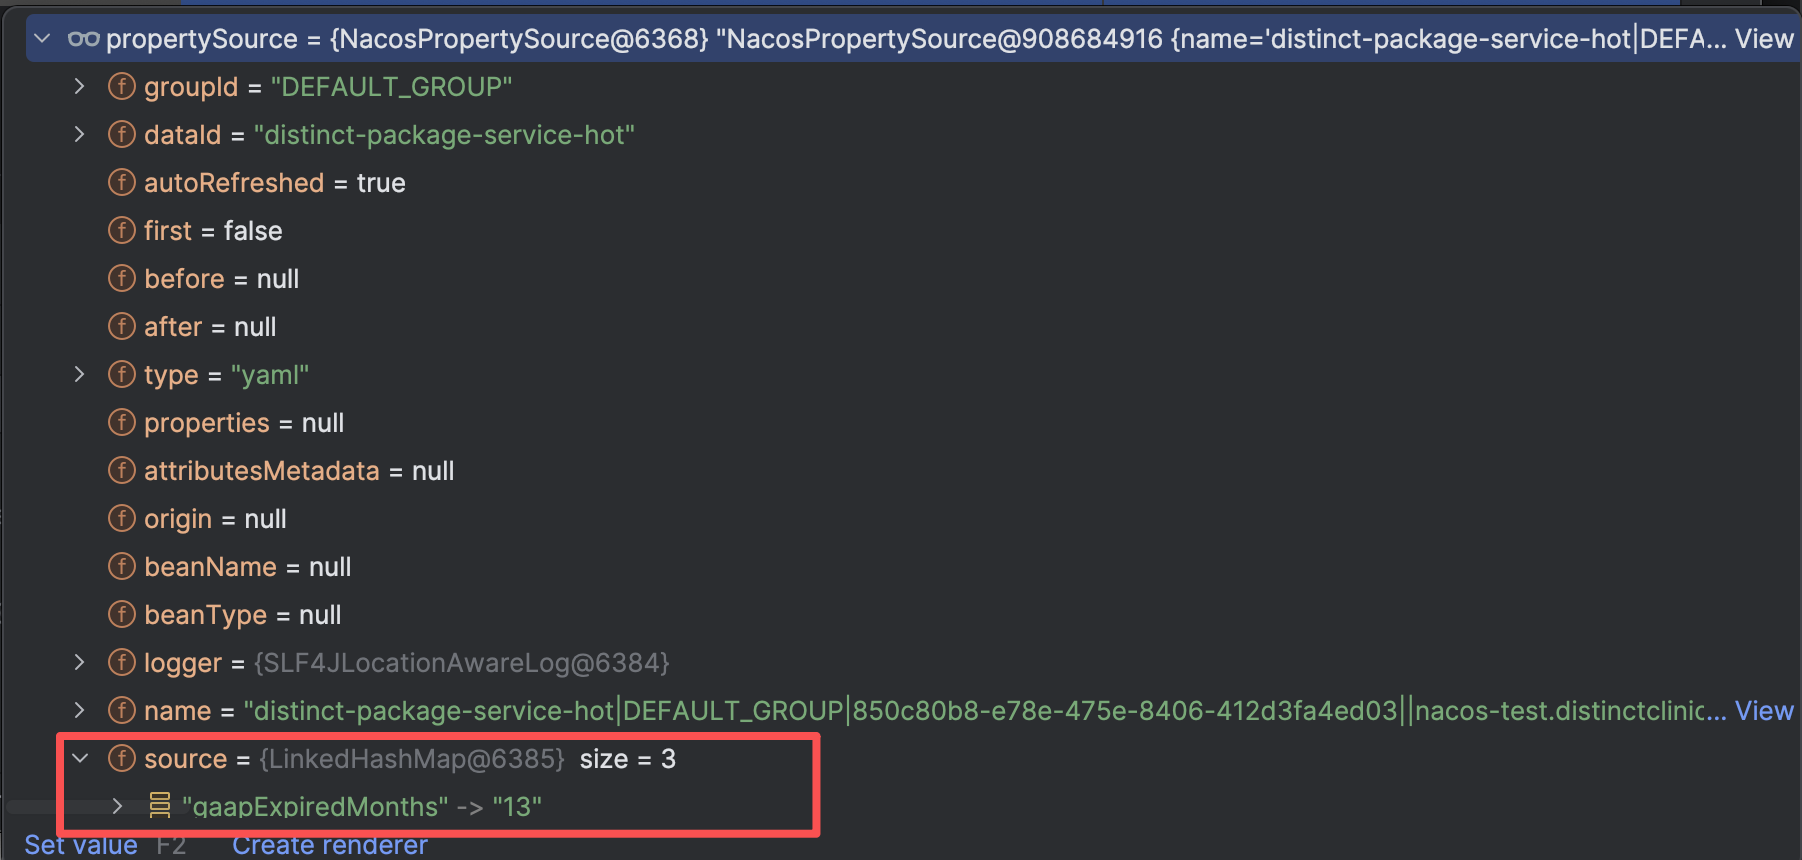
}eg某一个 propertySource 的情况
二、解析
上面已经知道了如何去加载Nacos的配置到容器里面,再来看看某一个字段如何去解析的
问题:如果有两个data-id, dataIdA和dataIdB,里面的内容如下。在dataIdB里面引用了dataIdA的变量,又是如何解析的呢?
# dataIdA
servicePort: 8080

# dataIdB
server:
  port: ${servicePort}


# Java使用
@Value("${server.port}")
1、解析的入口
在SpringBoot里面有这样一个后置处理器 AutowiredAnnotationBeanPostProcessor, 它专门用来解析 @Autowired 和 @Value 注解。读取配置文件用的是 @Value注解 (关于 @NacosValue 的解析,下篇再说)
postProcessMergedBeanDefinition 会遍历每一个bean,看看是否需要进行处理
@Override
public void postProcessMergedBeanDefinition(RootBeanDefinition beanDefinition, Class<?> beanType, String beanName) {
    InjectionMetadata metadata = findAutowiringMetadata(beanName, beanType, null);
    metadata.checkConfigMembers(beanDefinition);
}
找到合适的bean构建 InjectionMetadata,然后存入 injectionMetadataCache 中
private InjectionMetadata findAutowiringMetadata(String beanName, Class<?> clazz, @Nullable PropertyValues pvs) {
// Fall back to class name as cache key, for backwards compatibility with custom callers.
String cacheKey = (StringUtils.hasLength(beanName) ? beanName : clazz.getName());
// Quick check on the concurrent map first, with minimal locking.
InjectionMetadata metadata = this.injectionMetadataCache.get(cacheKey);
if (InjectionMetadata.needsRefresh(metadata, clazz)) {
synchronized (this.injectionMetadataCache) {
metadata = this.injectionMetadataCache.get(cacheKey);
if (InjectionMetadata.needsRefresh(metadata, clazz)) {
if (metadata != null) {
metadata.clear(pvs);
}
metadata = buildAutowiringMetadata(clazz);
this.injectionMetadataCache.put(cacheKey, metadata);
}
}
}
return metadata;
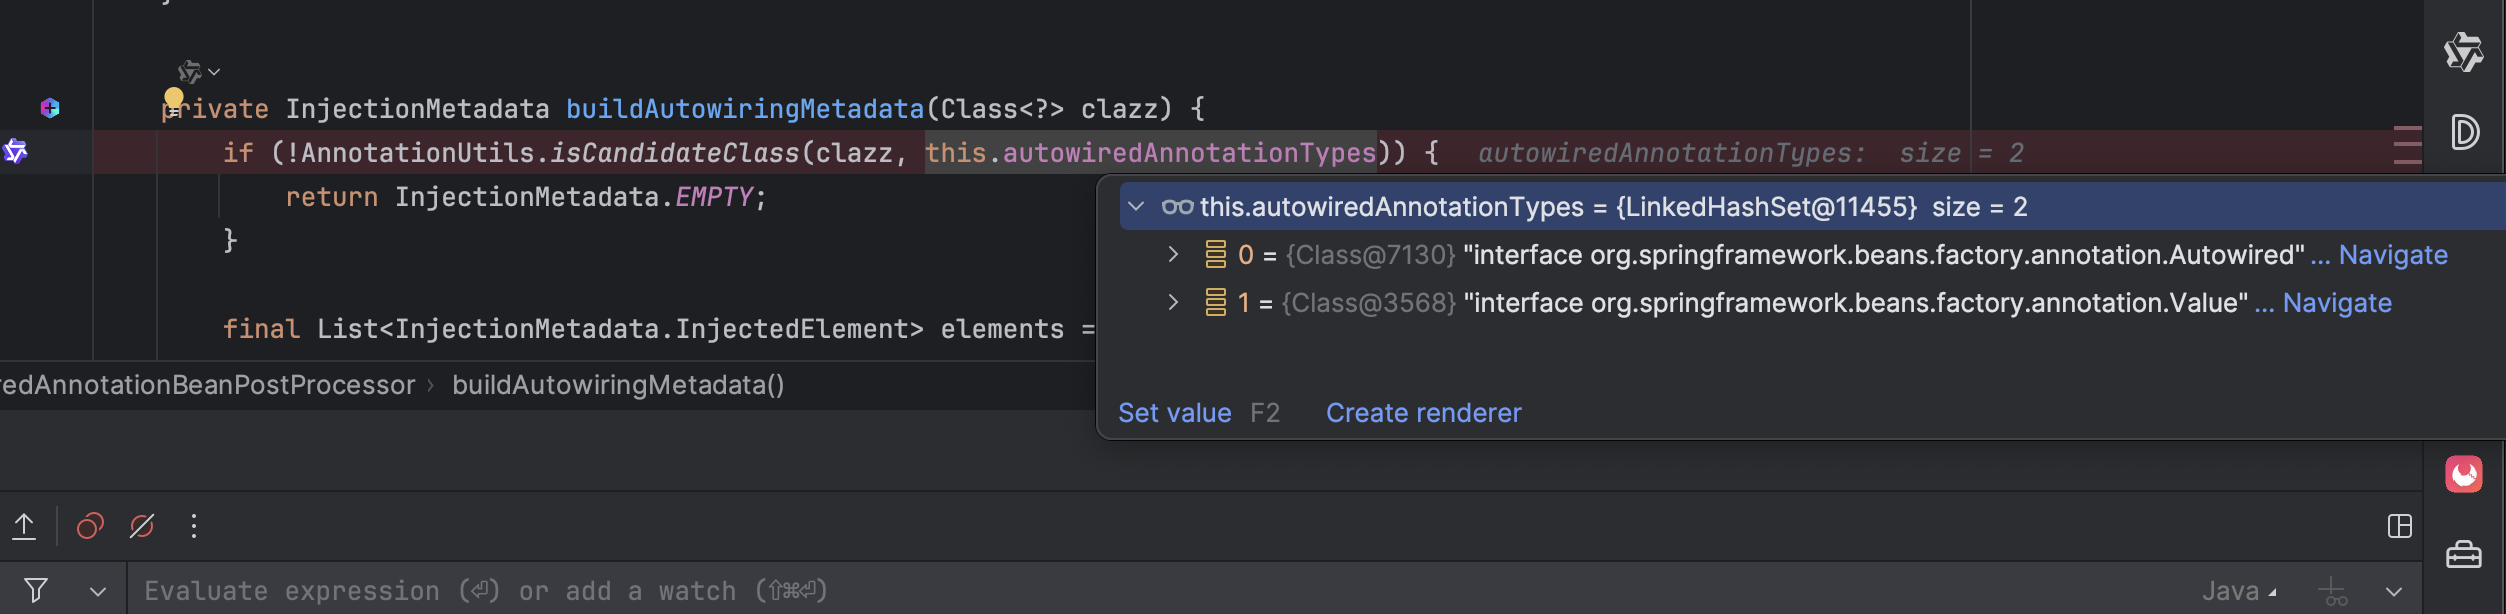
}buildAutowiringMetadata 的方法可以自行去看,下面给出头部截图,其实就是判断 class里面是否有这两个注解。 最终生成的是 AutowiredFieldElement对象
在后置处理器中,会遍历每一个bean,如果找到合适的就会进行 inject (解析并设置值),刚刚在 postProcessMergedBeanDefinition 已经符合的bean找到了
@Override
public PropertyValues postProcessProperties(PropertyValues pvs, Object bean, String beanName) {
    InjectionMetadata metadata = findAutowiringMetadata(beanName, bean.getClass(), pvs);
    try {
        metadata.inject(bean, beanName, pvs);
    }
    catch (BeanCreationException ex) {
        throw ex;
    }
    catch (Throwable ex) {
        throw new BeanCreationException(beanName, "Injection of autowired dependencies failed", ex);
    }
    return pvs;
}
2、解析的开始
前面说了生成的是 AutowiredFieldElement对象,所以执行的inject 就是
@Override
protected void inject(Object bean, @Nullable String beanName, @Nullable PropertyValues pvs) throws Throwable {
    Field field = (Field) this.member;
    Object value;
    if (this.cached) {
        // ....
    }
    else {
        value = resolveFieldValue(field, bean, beanName);
    }

    // 进行赋值
    if (value != null) {
        ReflectionUtils.makeAccessible(field);
        field.set(bean, value);
    }
}
resolveFieldValue 方法之后就是一步步进行解析,在到真正的解析方法之前,还有很多跳转,这里把路径列出来
- org.springframework.beans.factory.annotation.AutowiredAnnotationBeanPostProcessor.AutowiredFieldElement#resolveFieldValue
- org.springframework.beans.factory.support.DefaultListableBeanFactory#resolveDependency
- org.springframework.beans.factory.support.DefaultListableBeanFactory#doResolveDependency
- org.springframework.beans.factory.support.AbstractBeanFactory#resolveEmbeddedValue
3、一个特殊说明
resolveEmbeddedValue 方法的逻辑如下,最开始我一直没找到 resolver.resolveStringValue 执行的到底是哪里
@Override
@Nullable
public String resolveEmbeddedValue(@Nullable String value) {
    if (value == null) {
        return null;
    }
    String result = value;
    for (StringValueResolver resolver : this.embeddedValueResolvers) {
        result = resolver.resolveStringValue(result);
        if (result == null) {
            return null;
        }
    }
    return result;
}最后发现,resolver.resolveStringValue(result) 执行的是一个匿名类,也就是下面这个代码快
org.springframework.context.support.PropertySourcesPlaceholderConfigurer#processProperties(org.springframework.beans.factory.config.ConfigurableListableBeanFactory, org.springframework.core.env.ConfigurablePropertyResolver)
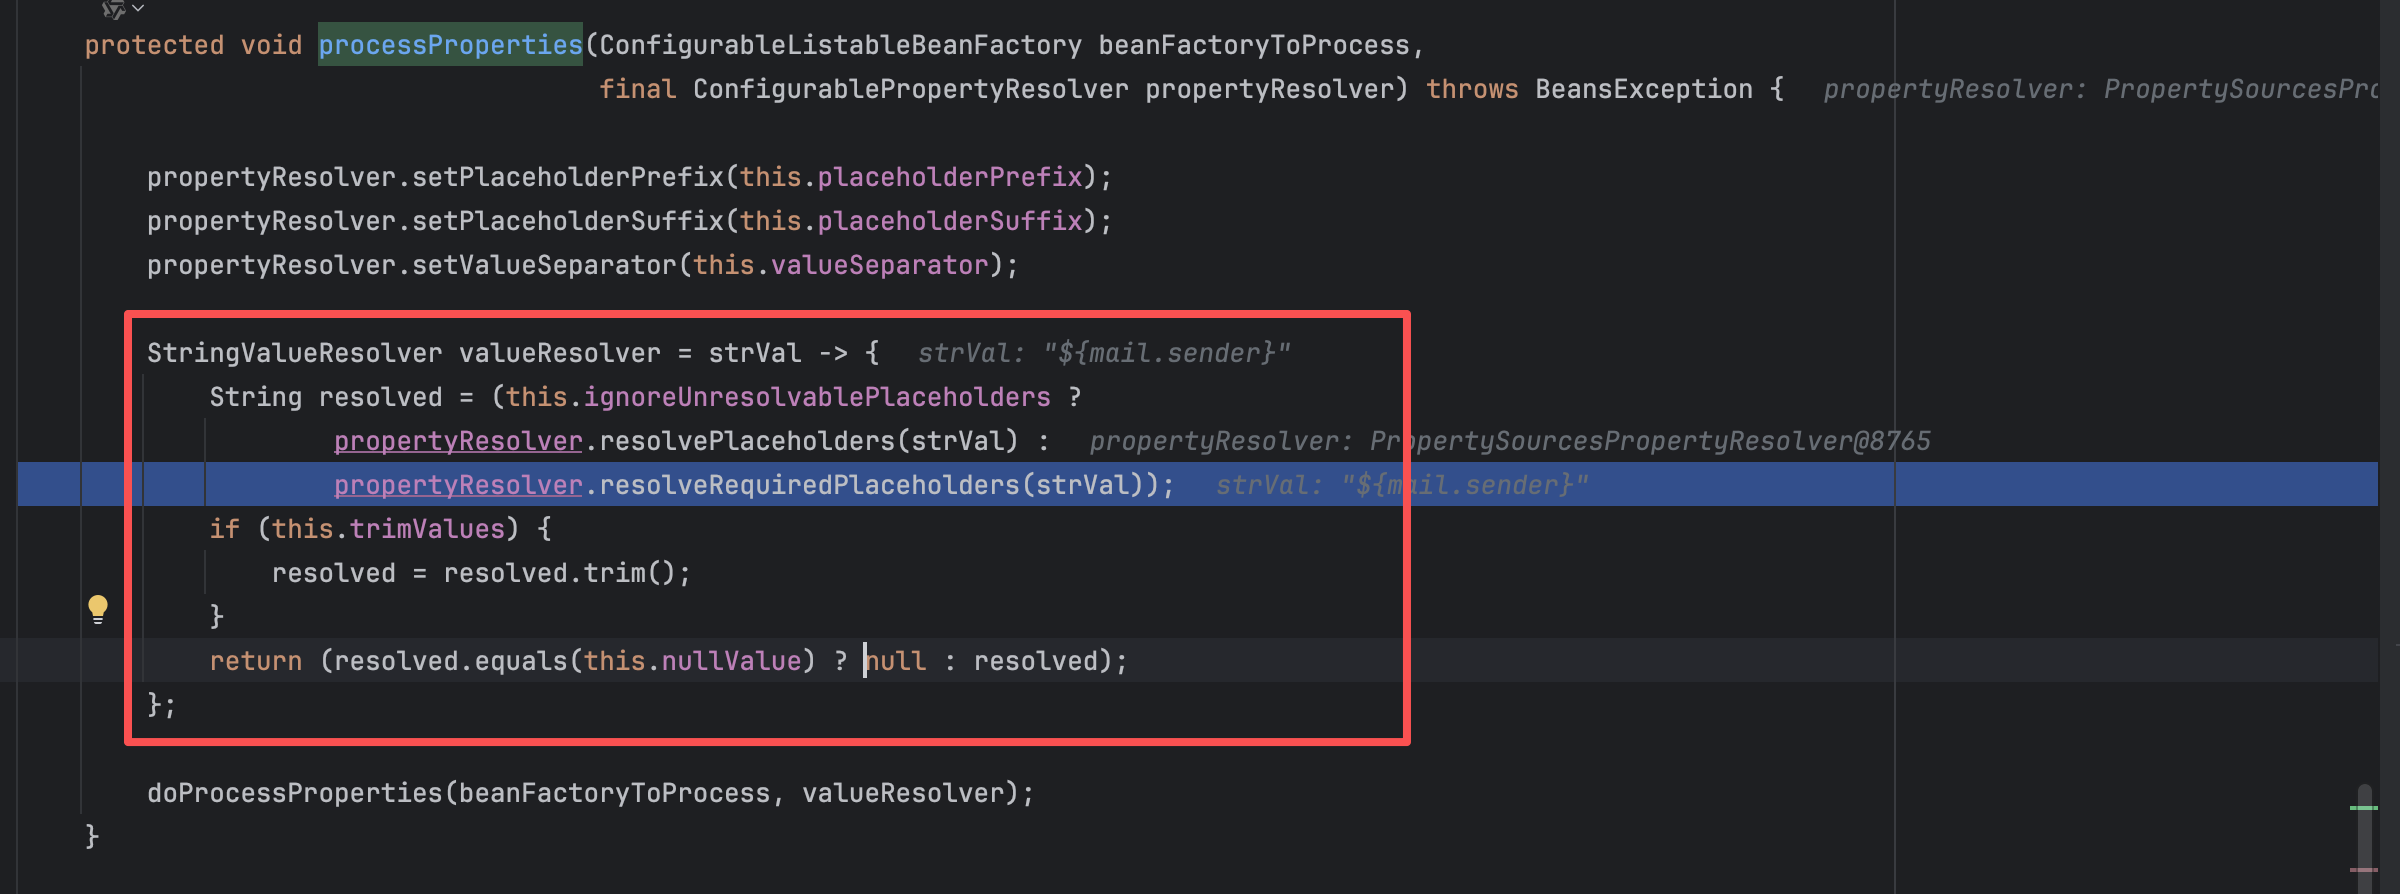
走到匿名类之后,还有一些路径,这里继续给出
- org.springframework.core.env.AbstractPropertyResolver#resolveRequiredPlaceholders
- org.springframework.core.env.AbstractPropertyResolver#doResolvePlaceholders
- org.springframework.util.PropertyPlaceholderHelper#replacePlaceholders(java.lang.String, org.springframework.util.PropertyPlaceholderHelper.PlaceholderResolver)
- org.springframework.util.PropertyPlaceholderHelper#parseStringValue
4、循环解析
parseStringValue 会去循环解析,再看看上面的问题
- 最开始得到 ${server.port} > server.port
- 拿 server.port 匹配数据到 ${servicePort} > servicePort
- 拿 servicePort 匹配到 8080
protected String parseStringValue(String value, PlaceholderResolver placeholderResolver, @Nullable Set<String> visitedPlaceholders) {

    int startIndex = value.indexOf(this.placeholderPrefix);
    if (startIndex == -1) {
        return value;
    }

    StringBuilder result = new StringBuilder(value);
    while (startIndex != -1) {
        int endIndex = findPlaceholderEndIndex(result, startIndex);
        if (endIndex != -1) {
            String placeholder = result.substring(startIndex + this.placeholderPrefix.length(), endIndex);
            String originalPlaceholder = placeholder;
            if (visitedPlaceholders == null) {
                visitedPlaceholders = new HashSet<>(4);
            }
            if (!visitedPlaceholders.add(originalPlaceholder)) {
                throw new IllegalArgumentException(
                        "Circular placeholder reference '" + originalPlaceholder + "' in property definitions");
            }

            // 递归调用解析
            placeholder = parseStringValue(placeholder, placeholderResolver, visitedPlaceholders);


            String propVal = placeholderResolver.resolvePlaceholder(placeholder);
            if (propVal == null && this.valueSeparator != null) {
                int separatorIndex = placeholder.indexOf(this.valueSeparator);
                if (separatorIndex != -1) {
                    String actualPlaceholder = placeholder.substring(0, separatorIndex);
                    String defaultValue = placeholder.substring(separatorIndex + this.valueSeparator.length());
                    propVal = placeholderResolver.resolvePlaceholder(actualPlaceholder);
                    if (propVal == null) {
                        propVal = defaultValue;
                    }
                }
            }
            if (propVal != null) {
                // Recursive invocation, parsing placeholders contained in the
                // previously resolved placeholder value.
                propVal = parseStringValue(propVal, placeholderResolver, visitedPlaceholders);
                result.replace(startIndex, endIndex + this.placeholderSuffix.length(), propVal);
                if (logger.isTraceEnabled()) {
                    logger.trace("Resolved placeholder '" + placeholder + "'");
                }
                startIndex = result.indexOf(this.placeholderPrefix, startIndex + propVal.length());
            }
            else if (this.ignoreUnresolvablePlaceholders) {
                // Proceed with unprocessed value.
                startIndex = result.indexOf(this.placeholderPrefix, endIndex + this.placeholderSuffix.length());
            }
            else {
                throw new IllegalArgumentException("Could not resolve placeholder '" +
                        placeholder + "'" + " in value \"" + value + "\"");
            }
            visitedPlaceholders.remove(originalPlaceholder);
        }
        else {
            startIndex = -1;
        }
    }
    return result.toString();
}
5、解析
得到某个key的时候,就会调用这个方法来从配置文件得到具体的值
private Object findPropertyValue(String key) {
    // attached 里面存放了第一步加载进去的 source配置
    ConfigurationPropertySourcesPropertySource attached = getAttached();
    if (attached != null) {
        ConfigurationPropertyName name = ConfigurationPropertyName.of(key, true);
        if (name != null) {
            try {
                // 里面会 for循环每一个 source
                ConfigurationProperty configurationProperty = attached.findConfigurationProperty(name);
                return (configurationProperty != null) ? configurationProperty.getValue() : null;
            }
            catch (Exception ex) {
            }
        }
    }
    return this.defaultResolver.getProperty(key, Object.class, false);
}
ConfigurationProperty findConfigurationProperty(ConfigurationPropertyName name) {
if (name == null) {
return null;
}
for (ConfigurationPropertySource configurationPropertySource : getSource()) {
ConfigurationProperty configurationProperty = configurationPropertySource.getConfigurationProperty(name);
if (configurationProperty != null) {
return configurationProperty;
}
}
return null;
}@Override
public ConfigurationProperty getConfigurationProperty(ConfigurationPropertyName name) {
if (name == null) {
return null;
}
for (PropertyMapper mapper : this.mappers) {
try {
for (String candidate : mapper.map(name)) {
Object value = getPropertySource().getProperty(candidate);
if (value != null) {
Origin origin = PropertySourceOrigin.get(this.propertySource, candidate);
return ConfigurationProperty.of(this, name, value, origin);
}
}
}
catch (Exception ex) {
}
}
return null;
}上面是用@Value注解,用 NacosValue也是一样的,只不过后置处理器变成了 NacosValueAnnotationBeanPostProcessor
三、总结
总结
- Nacos 有一个初始化的类 NacosConfigApplicationContextInitializer,继承关系
NacosConfigApplicationContextInitializer implements ApplicationContextInitializer,在 initialize 方法里会通过配置的 data-id 去请求Nacos获取所有的配置,并加载到容器中去 - AutowiredAnnotationBeanPostProcessor 会找到每一个使用到
@Value的地方,然后去匹配配置文件中的数据,进行解析(通过上一步已经把全部的data-id都加载到内存了)- ${server.port} > server.port
- server.port 匹配数据到 ${servicePort} > servicePort
- servicePort 匹配到 8080